 |
| Photo by Bryan Crump modelmayhem.com |
I've been making costumes and props for about a decade now. I'm not the best at it, but I enjoy the process of the build and showing them off at comic book conventions. With San Diego Comic Con being held this weekend (which I'm NOT at, darn it), I'm jealous of all the great costumers that are showing their wares. They are all over the news today! So in honor of the weekend, I wanted to share my last costume build with you...because I think the build is just as interesting as the costume itself.
I'll think about a costume for several months before beginning to cut/paint/sew anything, and this costume was no different. Oddly though, I'd been uninspired for several months but in Jan. 2014 I dreamed about being a local convention, All-Con, where I was going to show a Dragon Slayer costume with a six-foot tall decapitated dragon head in tow. I woke that next morning, drove to a local foam store, Allied Foam, and bought a ten-foot roll of closed cell foam to make the dragon head, then to Jo Ann Fabrics for all my costume's fabric needs. I had been inspired in a dream and was finally motivated! After a couple false starts (I'll detail that in the photo captions), I finished the costume in time to compete in the costume contest at Sooner Con 2014.
Like I said, I enjoy showing the costumes, and prepping for a contest helps me to make sure that my pieces are as good as they can be--given my limited abilities. That said, I'd won Best of Show at Sooner Con three times previously (2007, 2010, 2012) so I had to put up a costume that at least didn't betray those previous wins.
How did I do at the contest? Details below. I don't want to ruin it for you!
The following pics are a short record of the building process. I'll try to keep the descriptions as short as possible, so my apologies if the text gets lengthy.
 |
| I made this paper "test dragon" to see if my ideas would pan out in a three-dimensional, real-life mode. |
 |
| Relying heavily on my paper dragon, I began to cut out pieces of foam on a scaled-up size. First the neck and under- jaw, then the upper jaw. I used hot-melt glue to attach all the foam pieces |
 |
| Then I added the upper/side of the face, then the forehead. The nice depression near the nostrils was a happy accident! |
 |
| Here you can see the head without the neck. By the next photo, I'd added some segmented neck pieces. |
 |
| This was a major mistake. I used a vinyl drawer liner that had a snake-skin pattern on it. I thought it would look scale-like, so I first tried to use it to make horns, but the vinyl wasn't stiff enough to stand up, and then the glue I used did not ever cure and the vinyl just peeled off. So I set this monster aside and did nothing with it for 4 months! |
 |
| While waiting for inspiration about how to repair the snake-skin dilemma, I read about artists that use elephant eyes as a pattern for their dragon pics, so I down loaded this photo and began to work on Mr. Dragon's eyes. |
 |
| For the base of the eye, I used large serving spoons. I cut off the handles, painted the backs with glossy car-model paint... |
 |
| ...and glued them on! I think they work, even if they look too "alive." By that, I mean that the dragon looks awake and not recently decapitated. |
 |
| You can also see how I decided to use the elephant photo to add details to the dragon. I did this two ways: one, was to use the vinyl to layer around the spoons to create an eyelid look. The second was by using a rotary tool to cut the foam into scales, almost in an alligator skin pattern. I would learn to regret cutting into it once I stated to airbrush. Before painting, I had to seal the foam so that it would take paint. If not, the foam would just soak up the paint and look really sloppy. I used three cans of Plasti Dip to do this, but I should have used six. There ended up being too many porous-looking seams. My bad. |
 |
| My base layer of paint was just a few tubes of acrylic paint from Hobby Lobby that I layed down with a regular brush. |
 |
| Flipping the dragon over, I used regular spary paint to coat the neck. |
 |
| I bought a new airbrush of this project, an Iwata Eclipse. I'd used a Paasche before and hated it, but the Iwata was a dream. Here I added some sloppy "scales" on the neck. It wasn't meant to be the main part of the dragon head, just a hidden detail that would give the impression of scales. |
 |
| As you can see, the airbrush added a lot of depth to the scales, a detail that would have looked better by itself, in my opinion, without needing to carve into the foam. I am eager to try another project with foam and see if the airbrushing will look good on its own. |
 |
| Some more airbrushing, some fake teeth (plastic grizzly bear teeth and claws bought from a Boy Scout supply site) and I'm almost done. |

 |
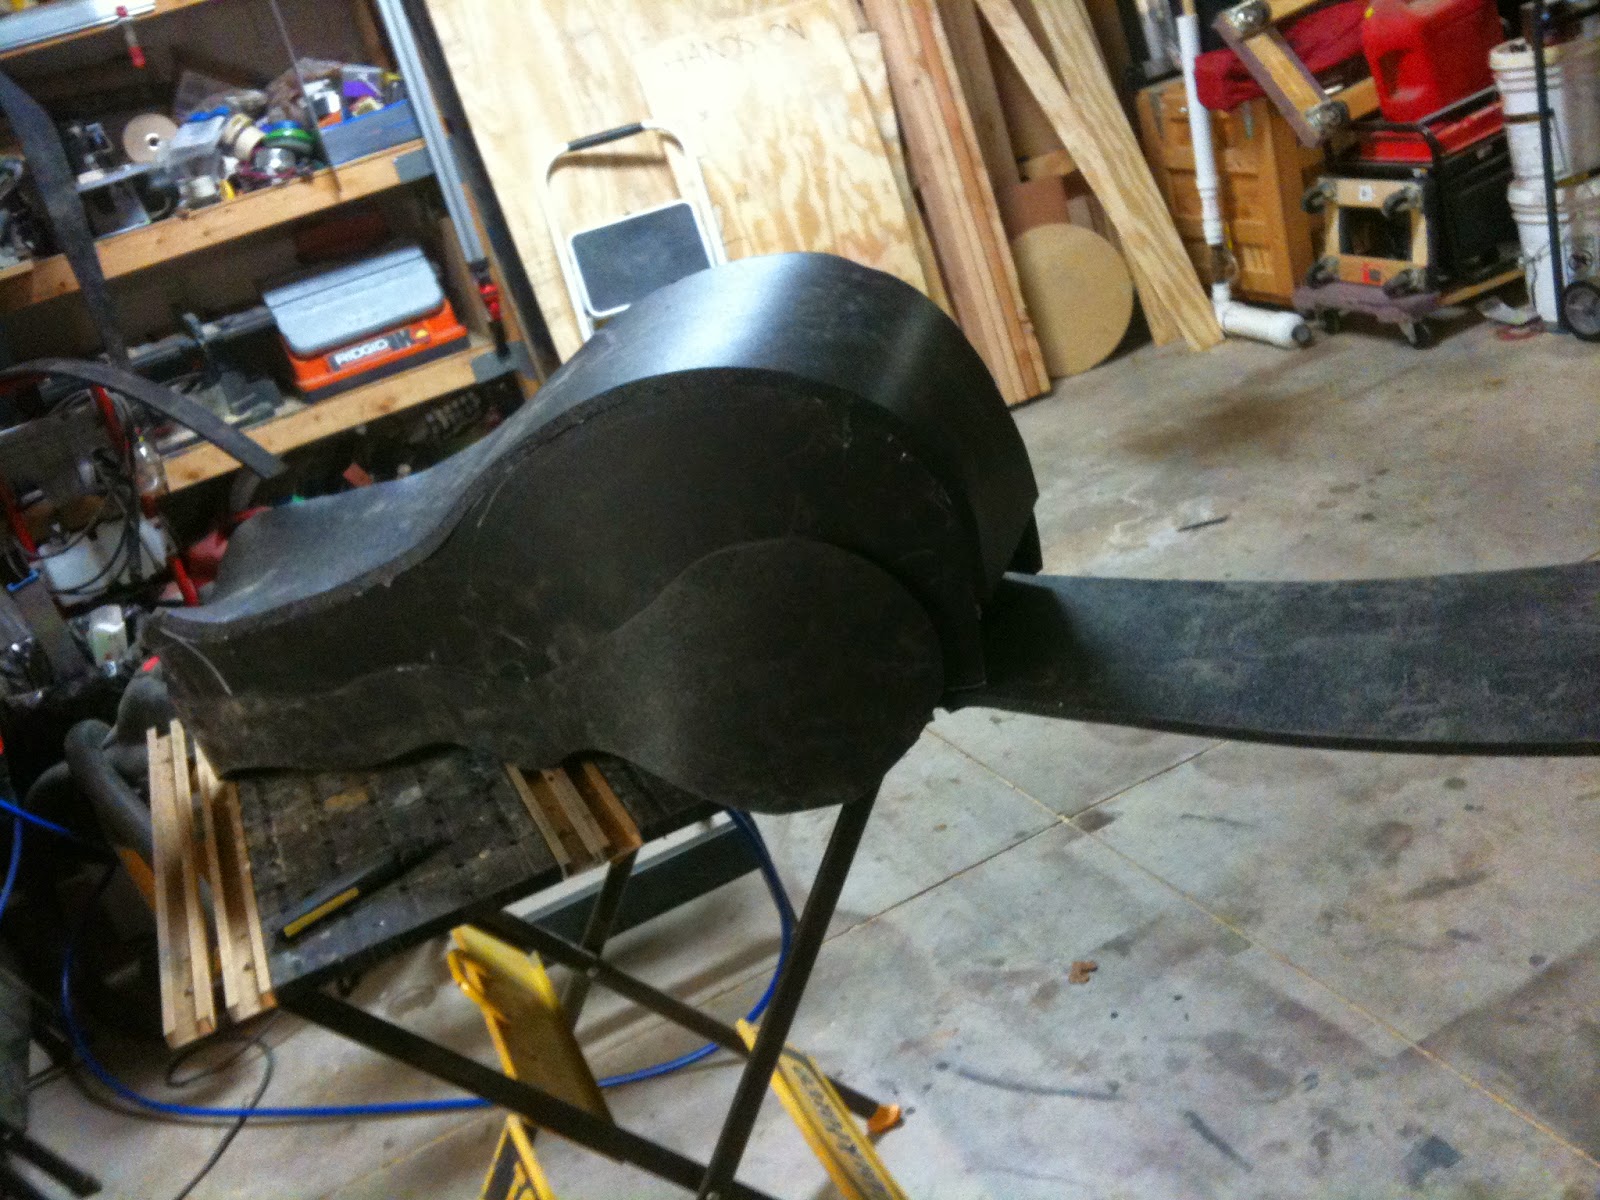
| Since this would be a recently decapitated dragon, I felt it needed some exposed viscera. Here we have a cross section of the vertebrae, neck muscles, and some tubing used as veins and nerves. After, I realized I'd forgotten to add an esophagus. Dang it! |

 |
| At the same time I started the dragon head, I cut out this profile for my Dragon Slayer ax. I envisioned a very large blade embedded into a heavy, caveman-like club. |
 |
| Once I painted the ax blade, I glued thick pieces of foam to each side of the wooden frame. I didn't want it all made out of wood--too heavy! Here the foam is compressed and rather flat. It had to smash it to glue it on, but after removing the weights, it sprang back beautifully. |
 |
| I sealed the foam with Plasti Dip, then painted and detailed with the airbrush. It ended up a little cartoony, but no one was really looking at the club. |
 |
| After four months of dragon head building, I needed to start on the actual costume Three days before the con, I began with the "hard" parts...the armor. I make my armor out of sheets of styrene. I cut it to shape, heat it in my kitchen's oven, then form it over pipes. These are embellishments for my wrist guards/gauntlets. I used a thinner pipe, about 2.5 inches in diameter, and that was too thin. They fit waaaay too tightly on my arms. |
 |
| Here are the rest of the "hard" armor pieces. Shoulder pauldrons, leg vambraces, arm gauntlets. Some hammered style paint and airbrushing would finish them off. I used a five gallon bucket to form the pauldrons, 4 inch pipe for the leg vambraces, and again, 2.5 inch pipe for the gauntlets. |
 |
| I used styrene to make the battle helmet. No heat forming, just cut, bend and rivet. |

 |
| Helmet with some silver paint, airbrushed highlights, and lots of blood splatter! Can't decapitate a dragon without buckets of blood! I should have taken photos of the "bloodying" process. It was so much fun! Just a large cup of paint, all the pieces hanging from string, and a paint brush. Took an hour to properly bloody everything. |
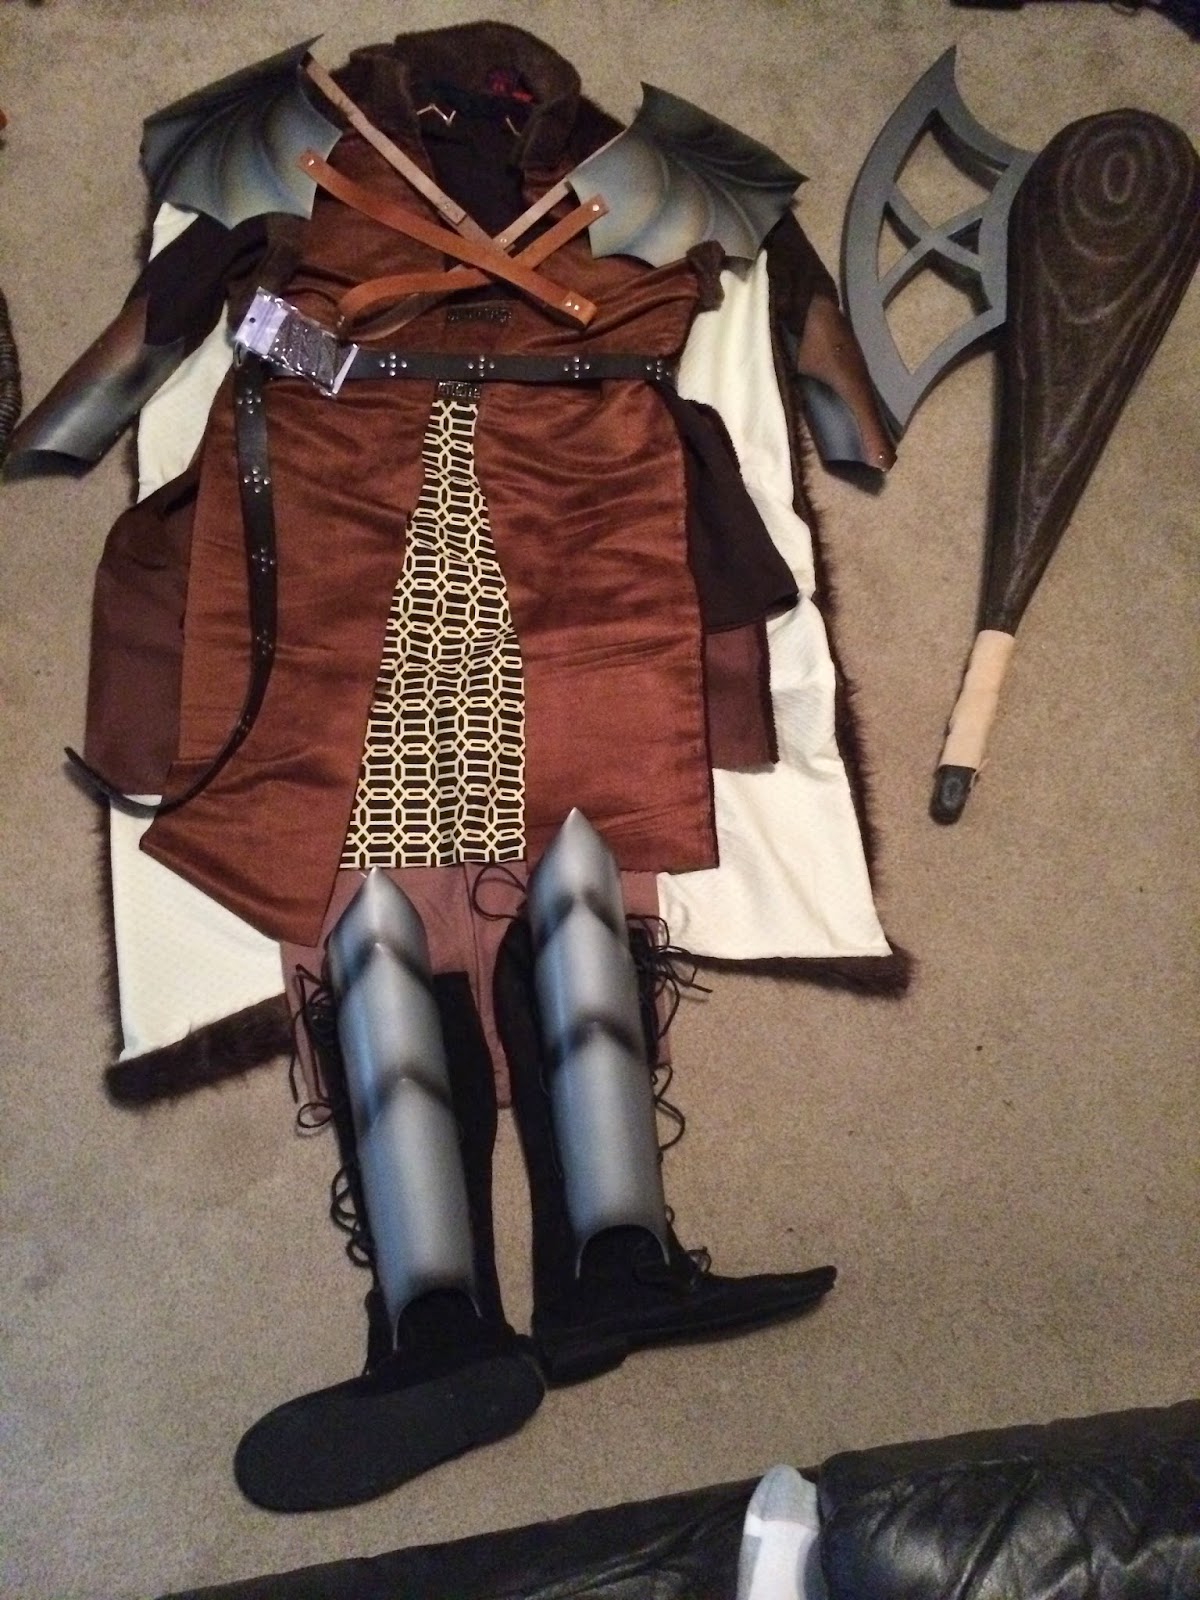 |
| Two days before the con, I started on the soft pieces. The cape, the overcoat, the skirt/apron were all made new. I repurposed the pants, belt, boots and under-tunic (that no one could see with all the armor and such). This is pre-blood, by the way. |
 |
| For the contest, I made a HUGE sack to drag the dragon, keeping him hidden until the last minute, when I tore it open and heaved it over my head. Just like my dream, the crowd went nuts! |
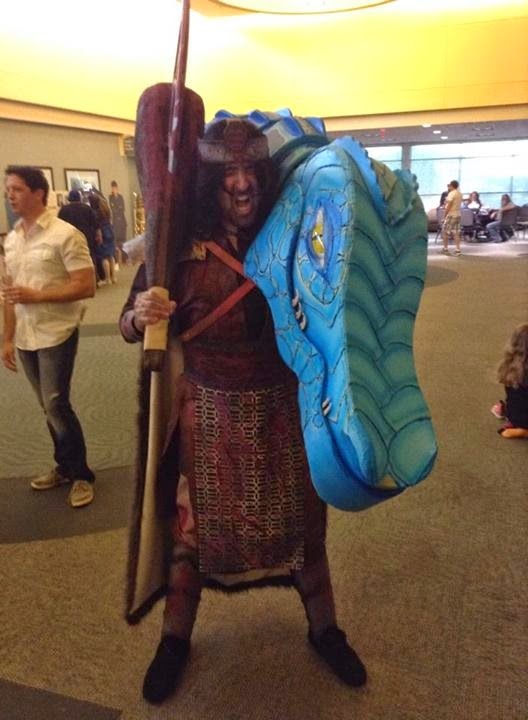


Well, after all that, I ended up winning Best of Show, again. That's four time! The prize was a $1200 Bernina sewing machine--not too shabby. Big thanks to Bernina of OKC for donating the prize and sponsoring the contest.
Not quite sure what my next project will be, but I had a blast with this one. If you have any questions about how I did anything here, drop me a line. I'm more than happy to share all of my "secrets".
No comments:
Post a Comment